What makes the I AM Jacques raincoat so appealing is making it in a raincoat fabric. However, if you’ve never sewn with this material, you’ll quickly realise it’s not as easy as it seems. That’s why today we’ll give you our little secrets to help you sew raincoat fabrics.

CUTTING

Nothing special to know regarding cutting the fabric. If you usually trace the pattern on the fabric, do so on the wrong side of the fabric. Use weights rather than pin to avoid damaging your fabric (more tips about pinning later in the article).
SEWING
That’s when it starts being a bit tricky. First things first, you need to change your needle for a ball point needle. As you’ll see the raincoat fabric is a knit jersey fabric on which a coating is added.
Equip your machine with a Teflon presser foot. This presser foot slides on fabrics that would otherwise get gripped by it. For example: leather, synthetic leather, and fabrics with plasticised coating, including the classic raincoat fabric. If you don’t have a Teflon presser foot, it will be very difficult to sew this fabric. If it’s easy to sew coated fabrics on the wrong side, it is near to impossible to have a neat finish when sewing on the right side. Indeed, the presser foot grips the fabric and doesn’t feed it correctly. We think the Teflon presser foot is indispensable for a better finish and to sew I AM Jacques with peace of mind.

IRONING
You will need to use a cotton press cloth (aka pressing cloth). A cotton press cloth is any cotton cloth that you place between the iron and fabric being ironed. It avoids melting your fabric and prevents damaging your iron. Choose a fabric scrap or alternatively a tea towel will work too. At I AM we push the temperature up to the maximum and use steam, a lot of steam, as much as possible. Iron all seams like this when working with coated rainproof fabrics.
PINING
All our habits are thrown all over the place when sewing coated fabrics. Indeed at I AM we always pin perpendicularly to the seam so the needle can slide on the pin without breaking. When you pin raincoat fabric, it creates holes on the coating and those holes are here to stay! We have 3 tips to solve this issue:
Pin parallel to the seam and within the seam allowance. If your pins are close enough from the edge of the seam, you can keep them in whilst sewing without risking breaking the needle. Otherwise, take them out as you sew.

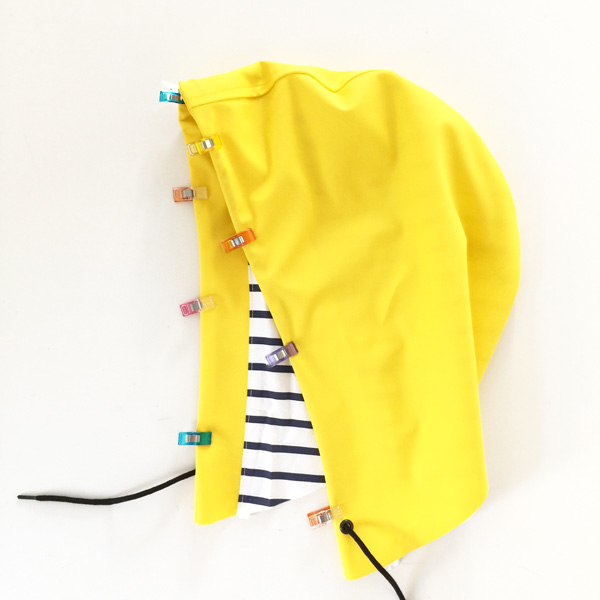
You can use clips. Clips are usually used to sew jersey fabric. For I AM Jacques we used clips to maintain the drawstring cord in place inside the hood when topstitching. You could also use clips instead of pins to keep the plain seams in place before sewing them.
And finally you can use masking tape to keep the pieces that need topstitching in place: patch pockets, flaps and button plackets. Careful not to use tape that is too sticky as it risks mark the fabric. Luckily we tested it before sewing…

WATERPROOFING
Test the waterproofness of your fabric by placing the right side under the tap. If the fabric gets damp you’ll need to use a re-proofer spray when your coat is finished.
For a fully waterproof coat, you can also use sealant or an waterproof adhesive tape along the seams on the wrong side of the fabric.
TESTING
Before starting sewing, you’ll need to make ALL your tests. Test all the seams and techniques proposed in the instructions with the fabric. Here’s how we proceeded:
– Fusing the interfacing on the raincoat fabric
– Plain seam on the raincoat fabric (universal presser foot)
– Plain seam on the lining (universal presser foot)
– Topstitching the raincoat fabric (Teflon presser foot)
– Topstitching the lining (universal presser foot)
– Ironing the 4 seams listed above
– Try adding a snap fastener if you have more than needed
– Using sealant/adhesive proofer and re-proofer spray to make the seams and coat completely waterproof (optional)
For plain seams of the raincoat fabric and lining as well as the topstitching of the lining test using a universal presser foot. Change the presser foot for the Teflon foot if the machine is not feeding the fabric properly. For topstitching the raincoat fabric, use the Teflon presser foot.
For a neater result, elongate the stitch. If you can precisely choose the length on your machine, we recommend 3 mm.

Note: if your fabric is thick and holds its shape nicely you can decide not to topstitch during the following steps: Pocket flaps (step 4), the center fronts and along the back of the neckline (step 12), the button placket (step 14) and at 3/16’’ from the seams assembling the hood (step 9). That’s what we have done for the pink version of I AM Jacques. Of course it’s a personal choice.
LAST TIP
And now a final tip. This is a tip for all types of fabrics. To make it easier to shape the pocket, make a template at the finished pocket measurements. For this, use a flat cardboard (one without emboss or deboss) something like a cereal box. Trace the dimensions of the finished pocket (indicated on pattern piece 1) and cut the template. Once you have hemmed the top of the pocket, place it wrong side up on the ironing board. Place the template on top and align the top of the template with the top of the pocket. Fold the edges of the fabric unto the template and iron it all. This way, you are sure the 2 pockets are exactly similar and at the right dimensions.

That’s it we’ve given you all our tips to sew coated raincoat fabrics. It is really important to take time to test everything before you start. In the end it will save you time, energy and certainly some fabric too… And of course, it’ll be more enjoyable to sew Jacques.
Now it’s your turn. Have fun.
If you haven’t met I AM Jacques yet, discover the pattern now.

Happy sewing!